Site Launch Process
⚠️ This document makes the assumption that you are launching a site on WP Engine. ⚠️
Pre-Launch Site Checklist
Please ensure all items in the Developer Pre-Launch Responsibilities document have been completed.
Pre-Launch DevOps (At least 48 hours before launch)
Create a backup of the source site.
This is either the dev or stage environment. You should be in a content freeze before you start this pre-launch backup. If it's too early or you can't institute a content freeze, it's fine to move on as there are a number of steps before you can utilize that backup anyway.
Create a production environment in the site portal.
While the backup is being created, we can prep the production environment. Click on the production tab and you’ll be prompted to Add an environment. It might seem logical to use the Copy an existing environment to this site, but we actually want to use Start with a blank site.
The reason for this is we need to have our domains in place, set to Primary, and pre-verified the DNS records before the site goes live. You can’t get the pre-validation codes before creating the environment. Copying the source site at this point won’t hurt anything. It just takes longer to initially build the environment and the automatic search/replace that WP Engine performs will be to the wrong domain, so we’re going to overwrite it anyway.
Preset DNS Records
- This is preferably done several days or even weeks ahead of launch.
- Confirm with the account manager that we have been provided DNS access. Also confirm you can actually view/edit the dns records.
- Review the current A record and the www record (preferably CNAME) for the domain. Update the TTL as low as it can go on relevant DNS records.
- Update the SPF record
- Identify the existing SPF record. This is a TXT record that will look similar to this:
SPF Record
v=spf1 include:_spf.google.com include:spf.constantcontact.com ~all
Add include:relay.mailchannels.net to this record. This is the mail relay service utilized by WP Engine. Adding it to the SPF record authorizes mail to be sent from from WP Engine using the site domain name. Your final record will look something like:
v=spf1 include:_spf.google.com include:spf.constantcontact.com include:relay.mailchannels.net ~all
Take care to note the current value of the primary A record and the A/CNAME record of www. Record those values some place safe. In the event something goes wrong and you need to roll back the site, having these records handy is a real lifesaver. It is acceptable to simply post these in the project Slack channel: Currect A Record IP address for example.com: 198.143.164.253
Prepare Production Environment
You’ve got a working dev site. We’re going to clone that to production. Assuming you’re in a content freeze and the dev site is 100% ready, make a backup of that site.
While the backup is being created, we can prep the production environment. Click on the production tab and you’ll be prompted to Add an environment. It might seem logical to use the “Copy an existing environment to this site”, but we actually want to use “Start with a blank site”.
The reason for this is we want to have our domains in place, set to Primary, and pre-validated before the site goes live. You can’t get the pre-validation codes before creating the environment. A few steps ahead we’re going to clone the dev site to prod with our domains in place, for the primary benefit of the Search & Replace during migrations. Copying the site now won’t hurt anything, it just takes longer to initially build and we’re going to overwrite it anyway.
Add the relevant domains to the production environment using the documentation provided by WP Engine. Make sure to add both the www and non-www domains to the site, keeping in mind which should be set as the primary domain. Confirm that you do want to pre-verify the domains. Add the provided DNS records to the clients DNS zone. This will speed up the time it takes WP Engine and Cloudflare to provision the SSL certificate.
Return to the Development backup you made previously. Restore this backup to the production server. Depending on the size of the site, this can take from several minutes to several hours. Great time to grab a coffee. ☕
Environmental Settings
SSH into the production instance and check the wp-config.php file. Verify the the WP_ENVIRONMENT_TYPE constant is set to production, and both the WP_HOME and WP_SITEURL values reflect the full domain name of the new site.
Example:
define( 'WP_ENVIRONMENT_TYPE', 'production' );
define( 'WP_HOME', 'https://example.com' );
define( 'WP_SITEURL', 'https://example.com' );
You can find a preset template of wp-config.php constants in 1Password.
Remove BH from prod site
While you are in wp-config.php, now is a good time to check if the BUGHERD_API_KEY constant is set. Comment this definition out using //.
Search & Replace
Using the WP CLI, run a search & replace on the production database, replacing references to example.829stage.com with www.example.com. (Please note if the production site does or doesn't use the www subdomain). The command you run will be similar to the following.
wp search-replace example.829stage.com www.example.com --all-tables --precise --skip-plugins --dry-run
- The
--all-tablesflag enables replacement on ALL tables in the database, regardless of the prefix, and even if not registered on$wpdb. - The
--preciseflag forces the use of PHP (instead of SQL) which is more thorough, but slower. - The
--skip-pluginsflag skips loading plugins. WordFence tends to throw errors on WP Engine when running CLI commands. You could only skip WordFence by specifying it in the flag--skip-plugins=wordfence, but in my experience you achieve the fast results by skipping plugins altogether. - The
--dry-runperforms the entire search/replace operation and displays a report, but doesn't write changes to the database.
Once you are satisfied with the results of the search & replace operation, remove the --dry-run flag and run it once more to write your changes to the database. Depending on your scenario, it may be necessary to perform more than one search & replace operation. It would also be prudent to run a search-replace against the dev site url, just to be sure there aren't any lingering references.
Flush the cache using the WP Engine Portal.
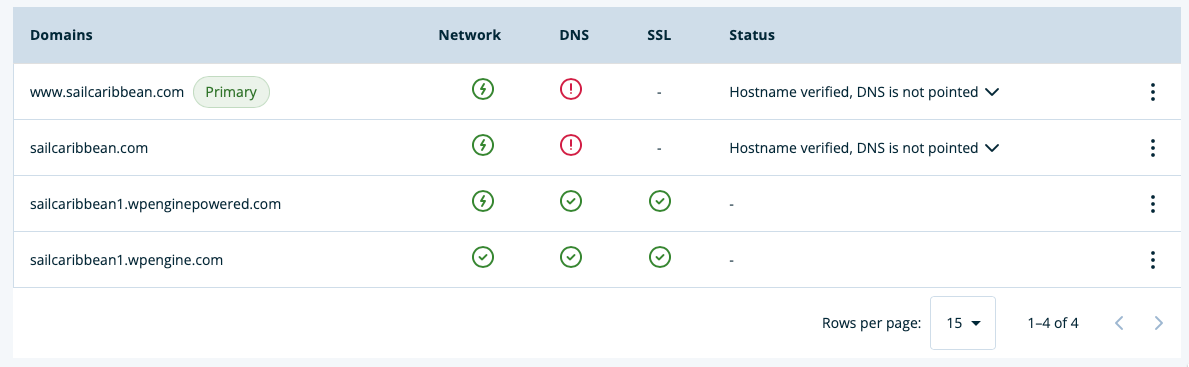
Confirm SSL pre-validation
You can verify the domains have been pre-validated on the Domains tab within the WP Engine Portal. The DNS will still show in error, but the Status should read Hostname Verified.
Smart Plugin Manager
Make sure Smart Plugin Manager is activated on the Production environment. It needs to be configured to run in off hours overnight and the maintenance message should be disabled.
Site Launch
At this point you are ready to launch the website! Update the DNS, setting the primary A and the A/CNAME record to the new values using the Advanced Network within WP Engine.
Monitor DNS propagation for the domain via WhatsMyDNS.com. If you are checking the site in your browser, ne warned that caching is a very common problem here. Incognito is a friend, but a different browser is a better friend. Remember that Safari can be used for more than just downloading Chrome.
You will likely find that before you see the new site, you’ll get an SSL error. This is because the SSL certificate from WP Engines Advanced Network has not yet been issued (even though the domain has been pre-validated). Spamming the Refresh Status button has yielded no significant increase in SSL issuance time, but I feel like I’m contributing to the team when I do. If more than 10 minutes have passed since the DNS was reported as connected in the WP Engine Portal, you should likely start a support chat.
Post Launch
Once site is up, flush the cache using the WP Engine Portal and quickly perform a visual audit of the site:
- Confirm domain name is correct.
- Confirm clicking on a link keeps you on the same domain (and doesn't send you to a 829stage.com domain).
- Confirm images are working.
- Confirm integrations are functional.
- Confirm embeds are displaying. (If they are not, the production domain may not be whitelisted.)
- Confirm 829 Filters indexes are functional.
You next step is to run a Screaming Frog scan of the site. Once this scan is complete, you want to:
- Confirm indexibility. Make sure the homepage isn't displaying as unindexable. If so, check
Settings -> Readingin the WP-Admin and confirm thatDiscourage search engines from indexing this siteisn't checked. - Make sure no 829dev/stage.com domains are appearing
- Review 404 and 500 errors.
At this point, you should notify the AM/PM of the project that the site is live. The project team will do some of their own quick testing before notifying the client.
Plugin Configuration
- Add/Enable WordFence
- Install premium license
- Standard WordFence configurationo to be developed.
- Add/Enable ManageWP plugin
- Add new site to ManageWP
- Enable the following settings:
- Backups
- Link Monitor
- Security
- Performance
- Uptime Monitor
- White Label
- Add site to UptimeRobot